How to Clean Your Air Fryer: An Easy Guide

Our evaluations and opinions are not influenced by our advertising relationships, but we may earn a commission from our partners’ links. This content is created by TIME Stamped, under TIME’s direction and produced in accordance with TIME’s editorial guidelines and overseen by TIME’s editorial staff. Learn more about it.
Air fryers have become a staple in many kitchens, prized for their ability to create crispy, delicious meals with less oil than traditional frying methods. However, to keep your air fryer functioning at its best and to ensure your food always tastes great, regular cleaning is essential. While the ideal scenario involves cleaning your air fryer after each use, the reality is, frequent usage can make this seem daunting. This guide provides practical tips for maintaining your air fryer, covering everything from daily upkeep to deep cleaning, ensuring your appliance stays in tip-top shape without overwhelming you with constant chores.
Ideally, you’d thoroughly clean your air fryer after every use. But if you’re like me, you use your air fryer a lot and that would wind up being a ton of cleaning. One tip for daily upkeep of your air fryer is to wait until the appliance has cooled down after use, then wipe the exterior and interior down thoroughly with a damp cloth. I prefer a microfiber washcloth, but any dish towel would suffice.
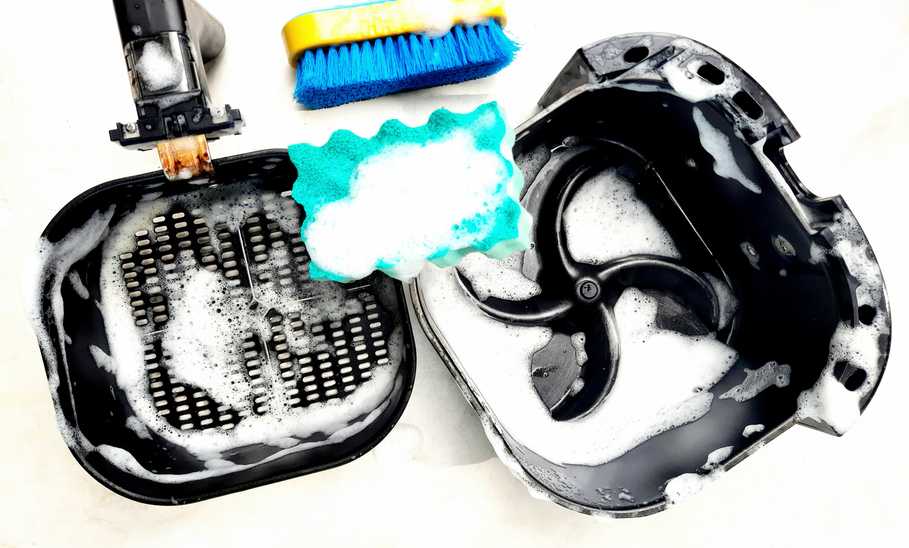
The fryer basket is a bit of a different story. Many air fryers have dishwasher-safe components that can go right in the same cycle as plates, silverware, and other kitchen items. You can rinse the basket or grates with soap and water with a sponge or cloth. Be sure to thoroughly rinse any parts you wash with dish soap, and use a less abrasive sponge for nonstick items—it’s usually the blue variety you’ll see at the store next to the standard green and yellow.
Use your best judgment when deciding if your air fryer basket should be cleaned, but the best plan is to clean the basket the same day you used it. Especially if you cooked anything saucy or food that leaves a bunch of crumbs in its wake (like mozzarella sticks, breaded chicken, and other similarly prepared foods).
The drip pan (commonly found on shelf-style air fryers and toaster oven air fryers) can get nasty fast. It catches anything that falls or drips from the foods suspended above. Once cooled, the drip pan can be washed with soap and water with a nonstick-safe sponge. Additionally, you’ll want to wipe down the heating element on the top of the inside of the air fryer. The more frequently you clean the drip pan and heating element (and heating element guard), the less effort it will take.
Simply put, if you don’t clean your air fryer at regular intervals, you’re going to have a bad time. Food that gets stuck to the heating element on the top of the inside of the air fryer, or food stuck on the drip tray or other elements inside the air fryer can get caked on. This also results in the air fryer emitting smoke as the excess food burns off, and causing an odor in your kitchen.
Seeing crumbs, sauces, leftover food bits, and other visible signs is your first indicator. You’ll also be clued in when you see a faint smoke or steam coming from the vents and gaps when your air fryer is in use. And if there are odors emanating from the air fryer that don’t resemble the food you are cooking, it’s time to do some upkeep.
A dishwasher is great to have generally, but it’s not an option for every kitchen or household. You can still easily clean your air fryer, inside and out, with a handful of common kitchen tools. Nonstick-safe sponges are a must. These sponges are specifically for cleaning the basket and/or the metal grates you find in the shelf-style units. You’ll also want an absorbent and tough towel or rag. I recommend a microfiber towel or cloth for this. The microfiber helps remove any oils leftover on the inside of the machine, and you only need to dampen with warm water before use.
Before starting, review the cleaning guidelines specific to your air fryer model.
Ensure the appliance has completely cooled to avoid burns. Make sure to leave the air fryer door open for this step.
Always unplug the air fryer before cleaning to prevent electrical accidents.
Take out the basket and tray. If they are dishwasher safe, place them in the dishwasher. Otherwise, soak them in warm, soapy water for about 10 to 15 minutes. Use a non-abrasive sponge or brush to gently scrub off food residue. Avoid harsh abrasives that can damage non-stick coatings.
Wipe down the inside of the air fryer with a damp cloth or sponge. For stubborn stains, use a mixture of baking soda and water to create a paste, apply it to the stains, let it sit for a few minutes, then gently scrub. Do NOT use baking soda on nonstick surfaces. Be cautious around the heating elements, using a soft cloth to clean them without getting them too wet.
Inspect the air vent for debris or blockages. Use a small brush or toothbrush to clean the vent gently. Wipe the surrounding area with a damp dish towel or microfiber cloth.
Wipe down the exterior with a damp cloth. For the control panel, use a slightly damp cloth, avoiding excessive water or cleaning solutions to prevent damage to the electronics.
Ensure all parts are completely dry before reassembling the air fryer. This prevents rust or mold growth and ensures the appliance works correctly.
Once all components are dry, reassemble the air fryer. Plug it in and perform a test run to ensure it functions properly. I turn mine to the “french fries” setting for 60 to 90 seconds just to make sure there’s no issues with the functionality, and to be sure no soap residue is burning off causing an odor.
Make sure to clean your air fryer after every use. The less often you perform regular maintenance, the tougher the grease and debris will be to remove over time.
Air fryers are designed to help fry food like a convection oven, with far less oil. But that doesn’t mean no oil. A light drizzle or spray of oil can be the difference between a stuck-on mess and an easy soap and water wipe down. When cooking particularly greasy or saucy foods, consider using a liner.
Read, Also: How Do Air Fryers Work? A Complete Guide to a Kitchen’s Most Useful Appliance
Do not use this method for cleaning your air fryer. Time-saving shortcuts can seem tempting, but water evaporating in an appliance that is home to an electrical coil/heating element can be a recipe for disaster. Aside from the obvious danger, there’s a good chance you’ll damage or otherwise render the air fryer useless.
Once the air fryer has cooled, it’s a good idea to give the interior a wipe-down. The basket should at least be rinsed with soapy water and a sponge. Use your best judgment but remember that the less frequently you perform a simple wash/maintenance, the more likely you are to encounter greasy buildup and debris that will make cleaning much more difficult.
If you clean your air fryer regularly, you’ll run into fewer occurrences of grease buildup. However, grease will happen. You can soak the basket in hot or warm soapy water and then scrub with a non-stick friendly sponge. For particularly tough buildup, you can use a paste of baking soda and water. Just be careful using this method as baking soda can be very abrasive. Scrub lightly with the paste and rinse well afterward.
A 2:1 water to cleaning vinegar soak for the air fryer basket can be an alternative to the baking soda paste method. Allow your air fryer basket to soak in the mixture for seven to 10 minutes and then clean with soap and water. Rinse thoroughly. Avoid harsh chemical degreasers, as they never truly rinse off and will wind up in your food.
The basket, racks, and other internal components may be dishwasher safe. Make sure to check your user manual before running them in the dishwasher. Most often, you’ll want to stick to the top shelf. For my rack-style air fryer, I’ve found that the dishwasher is the only way to get the metal racks completely clean.
The information presented here is created by TIME Stamped and overseen by TIME editorial staff. To learn more, see our About Us page.


